This article describes basic settings which can be applied to improve Mac performance with realtime audio applications, especially in performance situations.
Note: If you have trouble getting your NI audio interface to work, find a troubleshooting guide linked in the Related Articles section below.
Audio Settings
Most audio applications offer a buffer size or audio latency setting as well as a sample rate in their preferences. The buffer size determines how much time is available to the computer to complete all calculations for continuous audio playback.
Depending on the processing power of your computer and the number of calculations needed for your application, we recommend a buffer size of 256 or 512 samples at a sample rate of 44100 Hz (on Mac OS X 10.9 or higher, we recommend 48000 Hz instead).
A buffer size of 256 samples is a good starting point. Decrease this value to 128 samples if there is a noticeable lag between your actions and the audio playback, for example when playing virtual instruments live with a keyboard. Increase to 512 samples if you experience dropouts in the audio playback.
Power Supply
Always play with your Macbook connected to the power supply, especially when using an external audio interface and / or MIDI controller. To make sure your Macbook is properly grounded, use the extension cable of the power supply.
USB Hub
For Mac models offering USB 2.0 / 3.0 ports, you may require an external USB hub to expand the number of external USB devices being used simultaneously. Newer Mac models do not offer built- in 2.0 / 3.0 ports. In this case, the use of a USB hub is mandatory. Please consider the following when including a USB hub in your hardware setup:
- Use only USB hubs that draw power from their own external power supply. They are known in the market as "powered USB hubs".
- If you use an external USB audio interface, do not connect it to the USB hub. Audio interfaces require the largest amount of power and computation, thus they must be connected directly to a free USB port. You may connect all other external devices to the USB hub into another free USB port.
Other Applications
Close all applications except the audio software you are using. This applies to any software not needed for your audio work, including internet browsers, email clients, and background processes.
Wi-Fi and Bluetooth
Network activity can potentially interfere with your audio playback, thus we recommend turning Wi-Fi / Airport off. To do this, click on the Wi-Fi symbol in the desktop header and select Turn Wi-Fi off in the menu (see screenshot below).
The same applies to Bluetooth connections. Switch off Bluetooth by clicking on the Bluetooth symbol in the desktop header and select Turn Bluetooth off in the menu (see screenshot below).
Energy Saver Settings
The Energy Saver on Mac provides several options to optimize the power consumption of your Mac. For audio applications, these should be deactivated. Go to System Preferences > Energy Saver. Move the sliders Computer sleep and Display sleep to Never and untick the checkbox Put the hard disk(s) to sleep when possible, as shown below.
Sleep Mode
If you are normally using the Sleep Mode (e.g. closing the lid of your Macbook) instead of powering down the computer, we recommend rebooting the system prior to playing with any audio applications.
Graphics Card Switching
If you own a Macbook Pro that has both Intel HD Graphics as well as a dedicated graphics card, we recommend to switch the graphics mode to Higher performance before starting your music software. You can do this in the Energy Saver section of the Mac OS System Preferences, by deactivating the Automatic graphics switching, as shown below.
Disable Sudden Motion Sensor (Laptops only)
If you’re recording in a loud environment, this optimization will prevent the Sudden Motion Sensor which temporarily stops the hard drive from spinning to prevent damage if your computer is suddenly moved from vibrations.
- Go to Macintosh HD > Applications > Utilities and open Terminal.
- Type 'sudo pmset -a sms 0' and press Return. This command will disable the Sudden Motion Sensor.
- Enter your administrator password when prompted.
- Type 'sudo pmset -g' to verify that this setting has indeed been applied.
To re-enable Sudden Motion Sensor:
- Type 'sudo pmset -a sms 1' and press Return. This command will enable the Sudden Motion Sensor.
- Enter your administrator password when prompted.
- Type 'sudo pmset -g' to verify that the setting has successfully been applied.
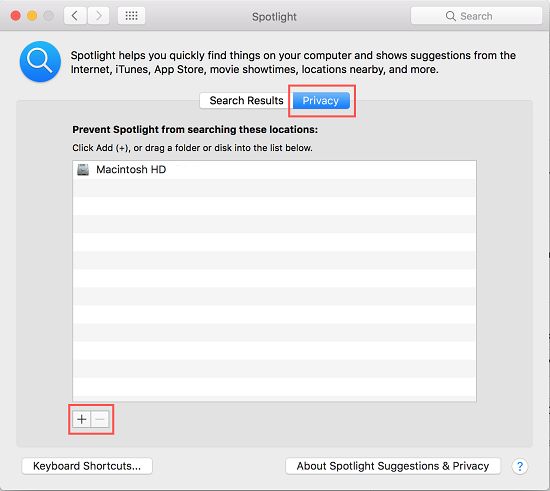
Disable Spotlight Indexing
The Mac Spotlight utility quickly finds files and folders by creating a virtual index of your system. To prevent indexing from interfering with the performance of audio applications, follow the below steps:
Note: After applying this step, Spotlight will no longer be able to search the drives you make private. You can easily remove your drives from the Privacy list to restore searchability afterwards.
- Go to System Preferences > Spotlight > Privacy.
- Click the + sign in the bottom left corner, then click on the drive you want to make private to add it to the list. To remove the drive from the list, click on the drive icon listed and use the – key.
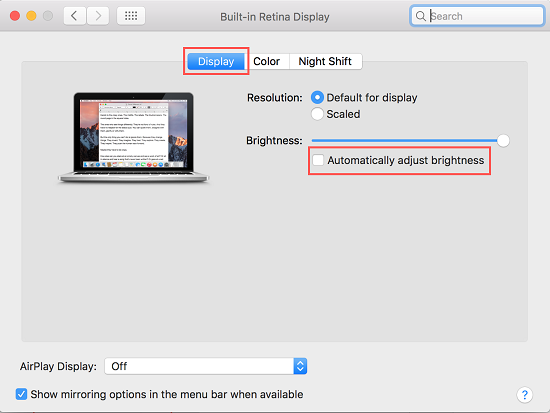
Disable Automatic Brightness
If your Mac has an ambient light sensor, disabling automatic brightness can improve waveform display-related performance. To disable it, follow the below steps:
- Go to System Preferences > Displays.
- Select your built-in display if you have multiple displays connected.
- Disable the Automatically adjust brightness checkbox.
Notes on Cloud Storage
Syncing content, projects, or samples with a cloud drive can cause performance issues. While it is possible to back your content up to a cloud drive, it is not recommended to configure real-time syncing. The syncing of your content, projects, or samples should only occur when the NI application is not in use.