This article explains how to automate the parameter changes of your Native Instruments plug-ins in Cubase.
TABLE OF CONTENTS
- Manually Drawing Automation Curves
- Recording Automation with a Mouse-Cursor
- Recording Automation with a MIDI Controller
Manually Drawing Automation Curves
- Create a Cubase Instrument Track and load a plug-in. In this example, we choose Massive.
Note: Please see this article for more information about inserting NI plug-ins in Cubase.
- Right-click (or CTRL + Click) the instrument track and choose Show Automation from the menu. This will display a sub-track containing automation parameters.

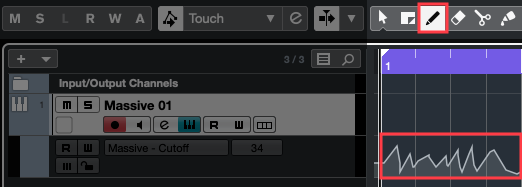
- Open the Volume drop menu and choose More... In the Add Parameter window, expand your plug-in's folder and select the parameter you wish to automate. In our example, we choose Massive > Cutoff. Click OK to confirm.

On the automation track, you will now see that the drop menu contains the plug-in parameter you selected for automation.
- Select the Draw tool from the Cubase header and draw an automation curve into the track.
- Activate the R (Read) button to engage playback of the automation curve.

Now when you play the Cubase project, the plug-in parameters will follow the automation curves written on the track.
Recording Automation with a Mouse-Cursor
- Create a Cubase Instrument Track and load a plug-in. In this example, we choose Massive.
Note: Please see this article for more information about inserting NI plug-ins in Cubase.
- Activate the W (Write) button on the Instrument track to enable the automation Write mode.
Note: The R (Read) button will automatically become active as well since it is also required for automation playback.

- Open the plug-in window and find some parameters you would like to automate. In this example, we will adjust the Wavetable Position (Wt-Pos) and Filter Cutoff software knobs in Massive (you can choose any adjustable parameters you like).

- Start Cubase playback and use the mouse cursor to move the parameter knobs on the plug-in window (e.g. Massive Wt-Pos & Filter Cutoff in this example). Since the automation W (Write) button is active, the parameter movements will be recorded while Cubase is playing. Stop Cubase playback once you are finished recording automation.
- Disable the W (Write) automation button so that only the R (Read) button is active, to prevent the writing of any further automation.

- To view the recorded automation curves, right-click (or CTRL + Click) the instrument track and choose Show All Used Automation from the menu. This will show separate sub-tracks for all recorded parameter changes.

Now when you play the Cubase project, the plug-in parameters will follow the automation curves written on the track.
Recording Automation with a MIDI Controller
- Create a Cubase Instrument Track and load a plug-in. In this example, we choose Massive.
Note: Please see this article for more information about inserting NI plug-ins in Cubase.
- Activate the W (Write) button on the Instrument track to enable the automation Write mode.
Note: The R (Read) button will automatically become active as well since it is also required for automation playback.

- Open the plug-in window and assign a parameter to be "MIDI-Learned" by a knob or slider on your MIDI controller. After enabling MIDI Learn in your plug-in, move one knob or slider on your MIDI controller. The plug-in knob you've chosen should start to move as well.

Note: In our example, right-click (or CTRL + Click) a parameter in Massive and select MIDI Learn. This process will vary depending on which plug-in is used.
- In the Cubase taskbar, go to: MIDI > CC Automation Setup.

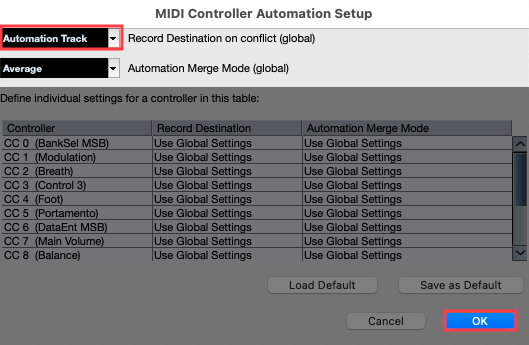
- In the MIDI Controller Automation Setup window, set the Record Destination drop-menu to Automation Track. Click OK to confirm.
- Start Cubase playback and move the assigned ("MIDI-Learned") knobs or sliders on your MIDI controller. Since the automation W (Write) button is active, the parameter movements will be recorded while Cubase is playing. Stop Cubase playback once you are finished recording automation.
- Disable the W (Write) automation button so that only the R (Read) button is active to prevent the writing of any further automation.

- To show the recorded automation curves, right-click (or CTRL + Click) the instrument track and choose Show All Used Automation from the menu. This will show separate sub-tracks for all recorded parameter changes.

Now when you play the Cubase project, the plug-in parameters will follow the automation curves written on the track.